Know the meaning of all those numbers when placing your order.
Puzzled about all those numbers on your check? You’re not alone! Deciphering the standard check can be a challenge. And that makes ordering the best options for your needs complicated.
We’re here to help. We want to make check ordering as efficient and easy as possible for you. Here is a quick overview that will explain what the numbers mean, and a look at the common options you can choose.
Fractional Number
A fractional number looks like a complex fraction it is usually located in the upper right of your check.
Example: 50-7044/2219 is the fractional number of ABA Routing # 221970443
The fractional number is used to determine the original bank that this check is being paid by. It is only needed when the MICR line, which contains the bank’s routing number, is damaged or missing.
The check fractional number typically shows 3 pieces of information:
- The first set of numbers are called the prefix code and in the above example it is the number 50 which represents the closest Federal Reserve bank branch of the issuing bank. This number is not required and is optional.
- The second set of numbers are called the Institution ID and in the above example it is the number 7044 whcih represents the issuing instituion ID. This number is required and determines digit 5-8 of the 9 digit routing number. (leading zeros are typically skipped on the fraction and therefore it may only have 3 digits and not 4)
- The third set of numbers are called the Federal Reserve bank code and in the above example is the number 2219 which represents the reserve bank the account is being processed through. This number is required and determines digits 1-4 of the 9 digit routing number and is located after the slash (/) (leading zeros are typically skipped on the fraction and therefore it may only have 3 digits and not 4)
Routing Number
Banks developed routing numbers more than a century ago to solve a major challenge: creating a consistently accurate method of identifying the issuing bank. Before this innovation, confusion, and errors were common. Once each bank was issued its own unique identifier, known as the routing number, the process of transferring money to complete the payment process became a lot more accurate.
.jpg)
The routing number is a vital piece of data needed to create your checks. At the bottom of your check is a line of numbers called the MICR line. Originally, banks would use magnetic ink character recognition (MICR) technology to read this strip automatically. Each bank has its own routing number, 9 digits long and start with either a 0, 1, 2, or 3. Many banks have moved over to OCR (Optical Character Recognition) with today's technology, which no longer requires special magnetic ink. Nevertheless, many banks still require MICR ink to process checks, so it’s best to play it safe and use MICR ink when printing checks.
All our checks are printed using MICR ink.
Account number
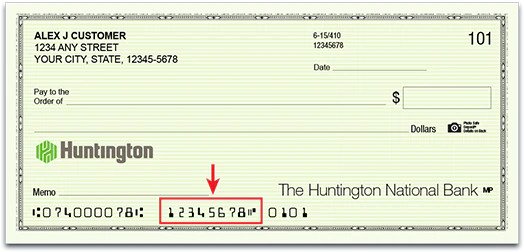
Next to the routing number on the MICR line is your account number. This is unique to your account, so the bank has a precise way of identifying the correct account from which to draw funds.
Starting Check Number
.jpg)
The check number is in the upper right and repeated in the MICR line. It helps you track your checks and organize your list of payments. It is usually 3 to 6 digits long.
You will seldom see a business check starting check number under #1001. The reason for this is risk-management, a tool that retailers used when checks were the most common form of payment, before credit and debit cards and electronic payments were available. The lower number indicated the bank account was relatively new, and businesses want to give the impression that they were in business for a longer period.
Lines on Checks
Checks, in essence, are forms that need to be filled in. If you use a printer to fill in the check, you do not need any lines on your check, as the printer will automatically print everything in the correct spot. But if you write your checks by hand, select the option to include lines on check. The lines will ensure your handwritten checks are done neatly and correctly.
Select NO for this option if you plan on using your checks with a printer.
The common areas that will have lines on the check (if selected) are:
- Date, in the upper right
- Payee line, in the middle area. The name of the vendor, business, group, or person the check is being made payable to.
- The dollar amount, to the right of the Payee line and directly below the Payee line.
Logo
Many organizations and businesses like to customize their checks with a logo as a way of brand recognition. Modern printing methods make it relatively easy to add the logo. When you include a logo, the check printer usually requests the graphics in a BMP, JPEG, or TIFF format. Tech Checks will add your logo free of charge.
Parts/Duplicates
Duplicate checks are typically used with manual (handwritten) checks. They can help make recordkeeping much easier. When ordering, you have a choice of single checks or duplicates. Both types function the same way, paying money out of your checking account. But duplicate checks can make life a little simpler.
Single checks are on a single piece of paper. To remember the payee and amount, you must record that information in the check register each time you write a check. If you forget, you’ll have to look up the online copy of the check from your bank’s website or app.
With duplicates, also called 2-part checks, you don’t have this problem. Underneath each check is a plain piece of paper that records exactly what you write on your check. It is carbonless and clean. Many people prefer referring to the duplicate for recordkeeping, rather than looking the information up later or remembering to use the check register each time they write a check.
Reverse Printing and Reverse Packing
Reverse printing, also called reverse packing, helps you use your printer to fill out your checks. Some sheet-fed printers, including laser, inkjet, or bubble jet, require that you load the paper face-down. If so, you want to select reverse printing. If your printer loads the paper face-up, you would not want reverse printing.
Not sure about your printer? It’s easy to check in 3 quick steps:
- Place a mark on one side of a sheet of printer paper.
- Keeping the marked side face up, put the sheet into the printer.
- Print a document of your choice.
Take a look at the printed document. Does the printing appear on the unmarked side? Then you want reverse printing for your checks. In short, if your printer prints face down, you do need reverse printing. If your printer prints face up, you do not need reverse printing.
On a practical level, reverse packing refers to the order that the checks are packaged to make them work with your type of printer.